Brewing a Classic German Pilsner: Mastering the Easy Lager Fermentation Method
Embarking on the journey of brewing your first lager can seem daunting, especially with styles as nuanced as the German Pilsner. These crisp, clean beers leave little room for error, as their delicate profiles can easily reveal any off-flavors or process shortcuts. While traditional lagering methods often involve extended conditioning times and precise temperature control, modern homebrewing techniques, exemplified in the video above, offer accessible ways to achieve excellent results.
This guide delves deeper into the practical steps and underlying principles shown in the video, providing a comprehensive walkthrough for crafting your own German Pilsner using an efficient, beginner-friendly approach to lager fermentation. We will explore everything from grain preparation and mashing fundamentals to hop additions, cooling, and the critical aspects of yeast health and fermentation management.
Recipe Essentials for Your German Pilsner
A true German Pilsner celebrates simplicity and quality ingredients. The foundation of this recipe centers on a German Pilsner malt, known for its clean, bready, and slightly sweet character. The video highlights a blend of nine pounds of Pilsner malt with an additional pound of Riverbend Malt House’s Great Chit malt, a local touch that can add a unique depth while still maintaining the classic Pilsner profile.
For hops, a German Noble hop is indispensable. Varieties like Hallertau, Tettnang, or Spalt provide the characteristic floral, spicy, and slightly herbal notes that balance the malt sweetness without overwhelming it. Yeast selection is equally crucial; a robust lager yeast strain, pitched at the correct rate and fermented cool, is key to developing that signature crispness. Additionally, a Whirlfloc tablet aids in achieving crystal-clear beer, a hallmark of the style.
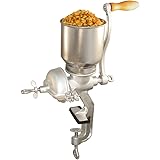
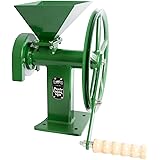
Crushing Your Grains: Beyond the Double Crush
The journey begins with milling the grains, a step that significantly impacts your brew’s efficiency. While many recipe kits come pre-crushed, often “double crushed” for convenience, the video demonstrates the benefit of crushing finer with your own grain mill. This additional crush can expose more of the malt’s starches, leading to a higher conversion into fermentable sugars during the mash, ultimately contributing to a slightly higher alcohol content.
However, finer crushing also demands careful attention to your lautering process to avoid a stuck mash. Ensure your grain basket is properly installed before adding the milled grains, a critical step to prevent catastrophic errors and ensure proper liquid flow.
Mastering the German Pilsner Mash
The mash is where starches are converted into fermentable sugars, defining the beer’s body and fermentability. For this German Pilsner, a target mash temperature of 149°F (65°C) is maintained for an hour, though the video’s live stream abridged this to 30 minutes for time efficiency. This lower temperature range promotes the activity of beta-amylase enzymes, which produce more fermentable sugars, resulting in a drier, crisper beer ideal for a Pilsner.
Recirculation is a vital technique demonstrated in the video. By continuously drawing wort from the bottom of the mash tun and returning it to the top, several benefits are achieved. Firstly, it enhances mash efficiency by constantly washing sugars from the grain bed. Secondly, it maintains a consistent temperature throughout the mash, ensuring optimal enzyme activity. Finally, it helps to set the grain bed, clarifying the wort before it heads to the boil kettle.
The Importance of a Mash Out
Following the primary mash, a “mash out” is performed by raising the temperature to 169-170°F (76-77°C). This step serves two primary purposes: it denatures the enzymes, stopping all further sugar conversion, and it reduces the viscosity of the wort, making it easier to sparge and extract remaining sugars from the grain bed. This leads to better overall efficiency and ensures a consistent sugar profile for fermentation.
Optimizing Your German Pilsner Boil and Hop Additions
Once mashing is complete, the grain basket is removed, and the wort is brought to a vigorous boil. The video highlights a unique “first wort hopping” technique, where German Noble hops are added directly to the kettle *before* the wort reaches a boil. This method is believed to contribute a smoother, more refined hop bitterness and aroma compared to traditional bittering additions at the start of the boil, especially suited for delicate lager styles.
During the boil, the wort is concentrated, sanitized, and bitterness from hops is extracted. For a 120V brewing system, maximizing heating efficiency is key. Using an insulation jacket and partially covering the kettle with a lid (offset to allow steam escape) can significantly reduce the time it takes to reach boiling temperature. Midway through the boil, a Whirlfloc tablet is added to aid in protein coagulation, ensuring a clearer final product. Additional hop additions, such as aroma hops, can also be introduced later in the boil or at flameout, depending on the desired hop character.
Rapid Cooling with a Plate Chiller
After the boil, cooling the wort quickly to fermentation temperature is paramount. This minimizes the risk of infection and helps “cold break” proteins settle out, contributing to beer clarity. The video demonstrates the use of a plate chiller, a highly efficient heat exchanger. Cold water is run through one channel while hot wort flows through another, rapidly reducing the wort’s temperature.
Proper setup involves connecting the wort out from the kettle to the chiller’s wort in, and a cold water source (like a garden hose) to the cold water in. The cooled wort then exits to the fermenter, while the hot water exits to a drain. Purging the chiller lines with a small amount of wort before sending it to the fermenter ensures no air pockets or stagnant water contaminate the batch.
The Easy Lager Fermentation Method: Yeast and Temperature
This “easy lager fermentation” method focuses on ensuring optimal yeast health and a controlled cooler fermentation without strictly adhering to multi-month lagering periods. The most critical step here is pitching sufficient healthy yeast. For colder fermentations typical of lagers, two packets of liquid or dry lager yeast are recommended to ensure a robust and clean fermentation. Sanitizing the yeast packets and scissors before opening is a simple but vital practice to prevent contamination.
After pitching, the fermenter (in this case, a 6.5-gallon bucket with a tight seal and airlock) is moved to a cool environment. While traditional lagering involves extended periods at near-freezing temperatures (around 33°F for 7-8 weeks), this method utilizes a cooler fermentation environment (like a crawl space as seen in the video) for initial fermentation. The goal is to keep the yeast happy and producing clean flavors, even if a full cold-conditioning period isn’t immediately possible.
Before sealing the fermenter, an original gravity (OG) reading is taken with a hydrometer. The video notes an OG of approximately 1.039-1.040, which is a good target for a sessionable German Pilsner. This reading, along with a final gravity (FG) reading post-fermentation, allows you to calculate the beer’s final alcohol by volume (ABV).
Understanding the Lagering Process
The term “lager” itself means “to store” in German, referring to the traditional cold storage period that defines the style. While the video refers to an “easy lager fermentation method,” it distinguishes it from true lagering. Proper lagering involves holding the beer at very cold temperatures (typically 33°F) for several weeks. This extended cold conditioning allows yeast and other particulate matter to settle out, clarifies the beer, and, crucially, allows the yeast to reabsorb and clean up fermentation byproducts like diacetyl, which can impart buttery or butterscotch flavors, resulting in the characteristic crisp, clean, and smooth profile of a well-made lager.
Even a shorter period of cold conditioning, as the video demonstrates with a four-day “lagering,” can improve the beer’s quality, reducing some fruity esters and contributing to a cleaner finish. However, for a truly exceptional German Pilsner, patience for the full 7-8 weeks of lagering is highly recommended, allowing the flavors to mature and the beer to achieve its full potential of crispness and clarity.
Effortless German Pilsner: Your Easy Lager Q&A
What is a German Pilsner beer?
A German Pilsner is a classic beer style known for its crisp, clean taste. It features a delicate balance of malt sweetness and floral, spicy hop notes.
What is the “easy lager fermentation method”?
This method is a beginner-friendly way to brew lagers by focusing on healthy yeast and a controlled, cooler fermentation. It helps achieve good results without needing very long, traditional cold storage times.
What are the main ingredients for brewing a German Pilsner?
The key ingredients are German Pilsner malt for the base, German Noble hops for characteristic flavor and aroma, and a robust lager yeast strain for a clean fermentation.
Why is it important to cool the beer quickly after boiling?
Rapid cooling after the boil is vital to prevent bacterial infection and to help proteins settle out. This process contributes to a clearer and more stable final beer.
What does “lagering” mean in brewing?
Lagering refers to a period of cold storage, usually at near-freezing temperatures, where the beer matures. This process clarifies the beer and allows yeast to clean up any unwanted flavors, resulting in a smooth, crisp finish.