The idea of brewing your own beer at home often feels daunting. Visions of complex equipment, precise measurements, and a significant time commitment might deter even the most enthusiastic prospective brewer. However, with modern innovations, the journey to make beer at home has been remarkably simplified. As seen in the accompanying video, flash brewing kits are revolutionizing the beginner experience, offering an accessible entry point into the rewarding world of home brewing beer.
These streamlined systems have been meticulously designed to remove much of the complexity traditionally associated with brewing. By focusing on essential processes and providing pre-measured ingredients, the barrier to entry for crafting your own ale or lager is significantly lowered. It is now possible to achieve excellent results with minimal investment in both time and specialized gear.
Understanding the Flash Brewing Kit Advantage for Home Brewing Beer
Flash brewing kits represent a paradigm shift for those looking to make beer at home without significant upfront investment or extensive technical knowledge. Historically, aspiring brewers were often faced with the need to acquire large kettles, wort chillers, hydrometers, and a myriad of other specialized tools. Flash kits, by contrast, are engineered to drastically reduce this initial overhead, making the entire process far more approachable.
Imagine if the most complex steps of brewing, such as precise ingredient weighing and complex mash schedules, were effectively managed for you. This is precisely the premise of these kits. Pre-portioned malts, hops, and yeast strains are supplied, ensuring that critical ratios are maintained without guesswork. The primary benefit lies in their ability to deliver consistent results with a simplified workflow, enabling a quicker progression from novice to confident brewer.
1. Essential Equipment and Ingredients Unveiled
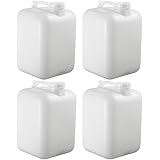
While the kits themselves consolidate many requirements, certain fundamental pieces of equipment are still indispensable for successful home brewing. A five-gallon fermenter, often a food-grade bucket equipped with a spigot, serves as the primary vessel where the transformation occurs. This type of fermenter is preferred for its ease of cleaning and sampling access. Furthermore, an airlock is crucial; it allows carbon dioxide to escape during fermentation while preventing atmospheric oxygen and contaminants from entering the wort.
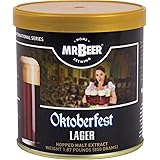
Sanitizer is not merely recommended but is an absolute necessity. All equipment that will come into contact with the wort post-boil must be meticulously sanitized to prevent microbial spoilage. Without proper sanitation, off-flavors can develop, or, worse, the entire batch may be rendered undrinkable. The kit itself generally contains the pre-measured malt extract, hops, and yeast, which are the fundamental building blocks of beer.
The Indispensable Role of Water Quality in Home Brewing
The quality of water used in brewing cannot be overstated; it is often said that beer is 95% water. As emphasized in the video, merely using tap water is frequently insufficient due to the presence of chlorine or chloramine. These chemicals, added by municipal water treatment facilities, can react with the yeast and other compounds during fermentation to produce undesirable phenolic off-flavors, often described as medicinal or band-aid-like.
Therefore, a purer water source is highly recommended. Bottled reverse osmosis (RO) water or spring water are excellent choices because their mineral profiles are generally consistent and free from harmful additives. This consistency allows the brewer more control over the final product’s flavor profile, ensuring that the subtle nuances of the malt and hops are not overshadowed or distorted by subpar water. Controlling water chemistry is a complex area in advanced brewing, but for beginners, starting with clean, neutral water is the most critical first step.
2. Initiating Your First Fermentation: A Step-by-Step Guide
The process of initiating your first batch of home brew with a flash kit is remarkably straightforward. Initially, three gallons of your chosen high-quality water are added to the sanitized fermenter. This partial volume facilitates the thorough dissolution of the concentrated malt extract. The entire contents of the kit, including the malt extract and any pre-portioned hops, are then introduced into the water.
Following this, the remaining two gallons of water are added, bringing the total volume to five gallons. A final gentle stirring ensures all ingredients are uniformly mixed. Once the wort is prepared, the fermenter is sealed, and the airlock is firmly placed in its bung. This creates an anaerobic environment, essential for the yeast to perform its work efficiently without competition from unwanted microorganisms.
Mastering Fermentation: Temperature, Time, and Yeast Activity
Once the fermenter is sealed and the airlock in place, the true magic of fermentation commences. The vessel must be placed in a dark location where the temperature remains stable, ideally around 68 degrees Fahrenheit (20 degrees Celsius), or typical room temperature. Consistency in temperature is paramount, as significant fluctuations can stress the yeast, leading to the production of undesirable off-flavors such as fusel alcohols (which contribute a harsh, solvent-like character) or excessive esters (which can impart overly fruity notes unsuitable for certain styles).
Darkness is also important, as exposure to UV light can cause a reaction in hop compounds, leading to “lightstruck” beer, often described as smelling skunky. Over the course of a few weeks, the yeast consumes the sugars in the wort, metabolizing them into alcohol and carbon dioxide. This process is evident by the active bubbling in the airlock, signifying that CO2 is being vented from the fermenter. This vigorous activity indicates a healthy primary fermentation, a crucial stage in developing the beer’s fundamental characteristics.
3. Beyond Fermentation: Preparing Your Homebrew for Enjoyment
The video briefly mentions returning “in a few weeks for the next step,” which is where the process typically shifts from active fermentation to preparation for packaging and conditioning. After approximately two to three weeks, depending on the yeast strain and beer style, primary fermentation usually concludes. At this stage, it is advisable to take a specific gravity reading with a sanitized hydrometer over several days. Consistent readings indicate that the yeast has finished its work and the beer has reached its final gravity (FG).
Once fermentation is complete, the beer can be transferred for packaging. Two primary methods are common: bottling or kegging. Bottling involves siphoning the beer into individual sanitized bottles, to which a small amount of priming sugar (typically corn sugar or dextrose) has been added. This sugar provides a small secondary fermentation in the bottle, producing the CO2 necessary for natural carbonation. Alternatively, for those with more advanced setups, transferring to a sanitized keg allows for force carbonation using a CO2 tank.
Regardless of the chosen method, the packaged beer will require a period of conditioning. Bottled beer typically needs another two to three weeks at room temperature for proper carbonation to develop. Kegged beer can often be force carbonated more quickly. This conditioning period is crucial for the flavors to meld and for a pleasant carbonation level to be achieved. Throughout these steps, stringent sanitation practices must be maintained; contact with any unsanitized surface can introduce contaminants, jeopardizing the integrity and flavor of your freshly brewed beer.
Tap Into Simple Answers for Your Homebrewing Queries
What is a flash brewing kit for homebrewing?
A flash brewing kit simplifies the process of making beer at home by providing pre-measured ingredients and reducing the need for extensive, complex equipment. It’s designed to make homebrewing accessible for beginners.
What basic equipment is essential for homebrewing with a flash kit?
You will need a five-gallon fermenter, an airlock, and sanitizer. The flash kit itself will typically supply the malt extract, hops, and yeast.
Why is water quality important when brewing beer at home?
Water makes up about 95% of beer, and its quality greatly impacts flavor. Using purified water, like reverse osmosis or spring water, is best to avoid off-flavors caused by chemicals like chlorine found in tap water.
What are the ideal conditions for beer to ferment properly?
For successful fermentation, place your fermenter in a dark location where the temperature remains stable, ideally around 68 degrees Fahrenheit (20 degrees Celsius). Consistent temperature and darkness prevent undesirable off-flavors and ensure healthy yeast activity.