Embarking on the journey of homebrewing doesn’t require a significant financial investment in sophisticated equipment from the outset, a point compellingly demonstrated in the video above. Many aspiring brewers are intimidated by the perceived complexity and high cost of entry into craft beer creation, yet the reality is far more accessible. With a few essential pieces of DIY beer brewing equipment, anyone can start crafting their own unique beverages and scale up as their passion grows.
The beauty of homebrewing lies in its adaptability, allowing enthusiasts to begin with minimal setups before gradually expanding their arsenal. Think of it as constructing a magnificent edifice: you begin with a sturdy foundation, adding increasingly intricate details over time. Similarly, your brewing journey starts with foundational pieces, evolving into a more complex system as your skills and ambitions develop. This approach not only makes the hobby more approachable but also allows for a profound understanding of each component’s role in the brewing process.
Starting Small: Your Essential Beginner Brewing Setup
For those taking their first step into the world of brewing, simplicity is key. The video highlights that sophisticated gear isn’t necessary; a basic 5-gallon kit, similar to the one the speaker used two decades ago, provides everything needed to produce quality beer. These starter kits typically include a stainless pot, a basic wort chiller coil, and the fundamental ingredients for an extract brew. The objective here is to demystify the process and allow new brewers to grasp the core principles without being overwhelmed by specialized tools.
Extract brewing, a fantastic entry point, bypasses the more complex mashing process, making it akin to using a pre-made cake mix rather than baking from scratch. While experienced brewers often graduate to all-grain brewing, starting with extracts offers a rapid and rewarding path to your first batch. Many kits also come with clear, step-by-step instructions, guiding you through the initial stages of sanitization, boiling, fermentation, and bottling. Therefore, the barrier to entry for crafting your own beer is considerably lower than many initially perceive, fostering confidence in nascent brewers.
Scaling Up Your Craft: Transitioning to Larger Batches
As your brewing confidence solidifies and your thirst for more beer (and more variety) intensifies, scaling up becomes a natural progression. Moving from 5-gallon batches to larger volumes, such as 10 or even 11 gallons, transforms the economics of homebrewing, making each batch more cost-effective. However, this expansion often necessitates more robust and specialized DIY beer brewing equipment, which the video meticulously showcases. It’s not about buying more of the same, but rather acquiring tools designed for increased capacity and efficiency.
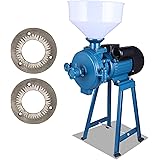
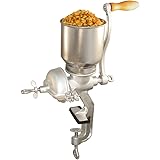
Unlike merely doubling your ingredients, scaling up effectively means optimizing your workflow and equipment for larger volumes. This shift often involves transitioning from simpler extract recipes to more intricate all-grain methodologies, which offer unparalleled control over flavor profiles and ingredient selection. This phase is where many brewers begin to invest in custom solutions, recognizing that tailored equipment can significantly enhance both the brewing experience and the final product. The move to larger batches is less about accumulation and more about strategic enhancement, much like upgrading a small sedan to a powerful truck for heavier loads.
Modified Kettles and Mash Tuns: The Heart of Your Brewery
At the core of an efficient larger-scale brew setup are the mash tun and boil kettle, and the video aptly demonstrates how half-barrel kegs (15.5 gallons) can be ingeniously modified for this purpose. These stainless steel vessels, originally designed for commercial beer storage, are incredibly durable and heat-resistant, making them ideal candidates for conversion. Welding on spouts for drainage, adding thermometer gauges for precise temperature monitoring, and integrating false bottoms are common modifications that transform these humble kegs into professional-grade brewing workhorses. Such custom fabrications offer a bespoke solution far more affordable than equivalent commercial options.
The mash tun, in particular, benefits immensely from insulation, as the speaker highlights using ceramic fiber to maintain a consistent temperature during the mashing process. This thermal stability is crucial for enzyme activity, which converts starches into fermentable sugars, directly impacting the beer’s sweetness and alcohol content. Conversely, an uninsulated mash tun requires constant heat input, risking temperature fluctuations and potentially compromising mash efficiency. The integration of a false bottom, meanwhile, elegantly separates the liquid wort from the spent grains, ensuring a clear runoff without clogging the drainage system. These modifications, though requiring some fabrication skill, represent a significant leap in brewing capability and efficiency, embodying the true spirit of DIY beer brewing equipment.
Efficient Wort Chilling: Immersion vs. Plate Chiller
Rapidly cooling the wort after the boil is a critical step in homebrewing, preventing the formation of undesirable off-flavors and minimizing the risk of bacterial contamination. The video illustrates the effectiveness of a copper immersion chiller, a simple yet highly functional piece of DIY beer brewing equipment that quickly brings down the temperature. This method involves circulating cold water through a copper coil submerged directly in the hot wort, a process that efficiently dissipates heat. The speaker’s ingenious use of pool water for discharge, rather than simply wasting it, showcases an eco-conscious approach to brewing.
While immersion chillers are a staple, some brewers opt for plate chillers, which offer even faster cooling by passing hot wort and cold water through alternating plates. Plate chillers, though more complex to clean due to their intricate internal structure, are incredibly efficient, akin to a high-performance sports car compared to a reliable family sedan. Regardless of the chosen method, the objective remains the same: to rapidly cool the wort to pitching temperature for yeast, preserving the delicate flavors and aromas developed during the boil. This swift transition is fundamental for ensuring a clean, vibrant final product, underscoring the importance of thermal management in the brew day.
Fermentation Vessels: From Buckets to Conical Fermenters
The fermentation stage is where the magic truly happens, transforming wort into beer, and the choice of fermenter significantly impacts ease of use and final beer quality. While a simple 5-gallon bucket with an airlock serves as an excellent starting point, as mentioned in the video, more advanced options cater to escalating brewing ambitions. Glass carboys offer a transparent view of the fermentation process, but their narrow necks and fragility present handling challenges, particularly when siphoning beer off the yeast bed, known as “trub.” In contrast, the speaker highlights a 14-gallon conical fermenter, a substantial upgrade for 11-gallon batches.
Conical fermenters, with their distinct cone-shaped bottoms and built-in racking arms and bottom dumps, are a game-changer for serious homebrewers. This design allows yeast and trub to collect at the very bottom, enabling brewers to harvest yeast for future batches or simply drain off sediment before packaging. The integrated racking arm, as shown, facilitates drawing clean beer from above the yeast bed directly into kegs or bottles, minimizing disturbance and potential oxidation. Though a significant investment in DIY beer brewing equipment, a conical fermenter streamlines sanitation and yeast management, making it an invaluable asset for those dedicated to producing consistently high-quality craft beer.
Storing and Serving: The Benefits of Kegging
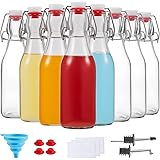
Once your beer has fermented and matured, effective storage and serving methods are paramount to enjoying your creation. The video champions the use of corny kegs (Cornelius kegs) as a superior alternative to bottling, offering unparalleled convenience and freshness. These robust stainless steel containers, equipped with ball lock valves for CO2 input and beer output, transform your homebrew experience by eliminating the tedious task of washing, filling, and capping dozens of bottles. Kegging streamlines the entire process, making it a highly attractive option for the volume brewer.
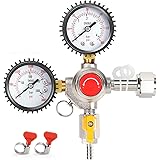
Connecting a CO2 tank with a regulator to your kegs allows for forced carbonation, providing precise control over the beer’s fizziness, unlike the often unpredictable natural carbonation in bottles. This system creates a pressurized environment that keeps the beer fresh for extended periods, preserving its flavor and aroma profiles. While porcelain pop-top bottles offer a stylish and reusable bottling solution, the efficiency and quality retention of kegging are unmatched for larger volumes. Ultimately, integrating kegs into your DIY beer brewing equipment setup revolutionizes how you store and serve, moving you closer to a professional taproom experience in your own home.
The DIY Kegerator: Your Personal Home Taproom
To truly elevate the kegging experience, a kegerator becomes an indispensable piece of DIY beer brewing equipment for many homebrewers. The speaker’s example of converting a secondhand refrigerator into a custom kegerator brilliantly illustrates how ingenuity can circumvent the high cost of commercial units. By drilling holes for taps and installing draft towers, a standard fridge transforms into a dedicated cold storage and serving station for multiple kegs. This not only keeps your beer perfectly chilled but also centralizes your entire serving operation, creating an impressive focal point for your homebrew creations.
Beyond serving beer, a DIY kegerator often doubles as a versatile cold storage unit for other brewing essentials, such as hops and yeast, particularly if it includes a freezer compartment. This multi-purpose functionality further enhances its value, making it a cornerstone of an advanced homebrew setup. The satisfaction of pouring a perfectly chilled pint of your own creation, directly from a tap you installed, is a profound reward for the effort invested in your DIY beer brewing equipment. It’s an affirmation of the craft, transforming your kitchen or basement into a microbrewery taproom, a testament to personal dedication.
Evolving Your Brewery: Future Upgrades and Innovations
The world of homebrewing is constantly evolving, with new technologies and sophisticated DIY beer brewing equipment emerging regularly. As the speaker himself notes, equipment available today far surpasses what was common two decades ago, offering unprecedented control and automation. Upgrades like glycol chillers, for instance, allow for precise temperature control during fermentation, enabling brewers to produce lagers and other temperature-sensitive styles with professional precision. These systems circulate chilled glycol through jackets on fermenters, maintaining exact temperatures crucial for yeast health and flavor development.
Another significant innovation is the all-in-one electric brew system, which combines the functions of a mash tun and boil kettle into a single, compact unit. These electric systems offer programmable temperature control, allowing for automated mashing schedules and precise boiling, simplifying the brew day significantly. The ability to control every variable with digital accuracy means more consistent results and less hands-on effort, making them highly attractive to busy brewers. Looking ahead, even canning presses are becoming more accessible to homebrewers, offering a professional packaging solution that extends shelf life and preserves freshness. The journey from a basic kit to these advanced tools reflects a brewer’s growth and commitment to their craft, demonstrating that the pursuit of perfect beer is an ongoing, exhilarating quest.
Crafting Clarity: Your DIY Brewing Q&A
Is homebrewing expensive to start?
No, you don’t need a significant financial investment to begin homebrewing. You can start with an affordable basic kit to craft your own beer.
What is the easiest way for a beginner to start brewing beer?
For beginners, starting with a basic 5-gallon kit and using the extract brewing method is recommended. This simplifies the process and helps you grasp core principles.
What does ‘extract brewing’ mean?
Extract brewing is a simpler method that bypasses the more complex mashing process. It’s like using a pre-made mix, offering a rapid path to your first batch.
What essential equipment is needed for a beginner’s brewing setup?
A basic 5-gallon starter kit typically includes a stainless pot, a simple wort chiller coil, and the fundamental ingredients for an extract brew.