Unpacking Your Australian Pale Ale Ingredients
Crafting an exceptional Australian Pale Ale begins with a thoughtful selection of high-quality ingredients, each playing a vital role in the final beer’s character. The grain bill forms the backbone, providing fermentable sugars and contributing to color and mouthfeel. For this particular recipe, a significant 96% of the grain bill comprises standard two-row Pale Ale malt, which establishes a clean, bready foundation. The remaining 4% is medium crystal malt, a crucial addition for complexity and color. Medium crystal malt introduces a delightful caramel sweetness and a subtle amber hue, enriching the beer’s profile without overwhelming the hop character. While Gladfield grains are recommended for their quality, remember that using readily available malts from your local homebrew shop or online supplier will work just as effectively. A 10-kilo grain bill is designed for a 50-liter batch, so adjustments will be necessary for smaller brewing scales.A Symphony of Hops: Bittering, Flavor, and Aroma
The hop selection for an Australian Pale Ale is where much of its distinctive personality truly shines, creating a vibrant sensory experience. For bittering, a modest 8 grams of Galaxy hops are added at the start of the boil, aiming for a gentle bitterness that invites rather than overwhelms the palate. This approach ensures the beer remains exceptionally approachable and balanced, a hallmark of the style. A more substantial 180 grams of hops are reserved for the whirlpool addition, focusing intensely on flavor and aroma rather than bitterness. This generous blend combines Azacca, Galaxy, and El Dorado hops, each contributing unique tropical and citrus notes. Azacca offers bright mango and pine, Galaxy brings passionfruit and citrus, while El Dorado layers on stone fruit and candy-like sweetness, culminating in a wonderfully complex and aromatic profile.The Power of Yeast and Clarity Agents
Yeast is the unsung hero of fermentation, transforming wort into beer and significantly influencing its flavor characteristics. Kveik yeast, specifically cultured for this recipe, is a robust and versatile choice known for its ability to ferment efficiently at higher temperatures, often producing clean flavors surprisingly quickly. If Kveik is unavailable, readily accessible strains like SafAle S-04 or Fermentis US-05 offer excellent alternatives, each contributing its own subtle nuances to the finished beer. Achieving a brilliant clarity in your Australian Pale Ale is a goal for many brewers, and Whirlfloc tablets are an invaluable aid in this pursuit. These tablets, derived from red seaweed, contain specific compounds that help coagulate proteins and other haze-forming particles during the boil. Adding three Whirlfloc tablets with 15 minutes remaining in the boil effectively clarifies the wort, ensuring a visually appealing beer that truly sparkles in the glass.Demystifying Your Brewing Equipment
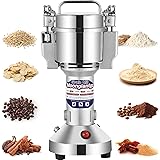
Brewing a high-quality Australian Pale Ale does not necessitate a professional-grade setup; rather, ingenuity and an understanding of the process are your most powerful tools. While a 65-liter BrewZilla system offers convenience and precision, it serves merely as a sophisticated pot and heater, akin to a high-end kitchen appliance. You can absolutely achieve excellent results with more basic equipment, such as mashing in an insulated cooler (an “eski”) and then transferring the wort to a large pot for boiling. The essence of brewing lies in the chemical and biological transformations, not in the sheen of stainless steel. If your setup lacks the capacity for whirlpooling, you can simply add your hops after cooling the wort to approximately 75 degrees Celsius, allowing them to steep effectively. Similarly, if sparging isn’t an option, recipe adjustments can be made to ensure you still extract ample sugars, proving that flexibility is key to successful homebrewing regardless of your equipment.The Art of Grain Milling for Optimal Extraction
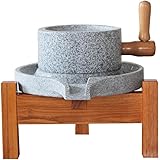
Proper grain milling is a critical step in the brewing process, directly impacting the efficiency of your mash and the clarity of your wort. The goal is to crack open the husks to expose the starchy endosperm for enzyme action, while keeping the husks largely intact to form a natural filter bed during sparging. Setting your grain mill to a 1-millimeter gap is typically an excellent starting point for achieving this delicate balance. Crushing grains too finely, leading to a powdery consistency, can create a “porridgy mess” in your mash tun, hindering liquid flow and making separation difficult. This can result in a “stuck sparge,” where the liquid struggles to drain through the dense grain bed, much like trying to drain water through finely ground coffee. Conversely, a crush that is too coarse, leaving many grains unbroken, severely reduces extraction efficiency, as if you were brewing tea with whole leaves instead of broken ones. The 1-millimeter sweet spot ensures the husks are adequately separated from the kernel, facilitating efficient sugar extraction while preserving the integrity of the filter bed.Precision Mashing: Converting Starches to Sugars
Mashing is the crucial stage where enzymes in the malt convert complex starches into fermentable sugars, defining the beer’s sweetness, body, and alcohol content. Setting your strike water temperature precisely is paramount, as it directly influences the final mash temperature once the grains are added. Beginning with strike water at 70 degrees Celsius allows for an immediate cooling effect from the cooler grains, stabilizing the mash at the desired 66 degrees Celsius. This 66-degree mash temperature is optimal for producing a fairly dry beer, as it favors beta-amylase activity, an enzyme that creates highly fermentable sugars. Simultaneously, enough unfermentable sugars remain to contribute a pleasant mouthfeel and body, preventing the beer from becoming too thin. When mashing in, adding grains gradually and stirring vigorously with a paddle or even a large spoon is essential to prevent “dough balls.” These clumps of dry grain encased in wet malt significantly reduce efficiency, as enzymes cannot access the starches within. A good mix ensures even hydration, allowing enzymes to work uniformly and maximize sugar extraction.The Benefits of Recirculation and Mash Filtration
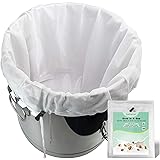
Recirculating the wort during the mash provides several significant advantages, particularly for efficiency and clarity. Using a recirculating sparge arm allows the wort to be continuously drawn from the bottom of the mash tun and returned to the top, filtering through the grain bed multiple times. This process helps to clarify the wort by settling grain particles and also ensures a more uniform temperature distribution throughout the mash, optimizing enzyme activity. While a dedicated recirculating system is beneficial, it is not strictly necessary for a successful brew. The fundamental principle is to ensure the grains are thoroughly mixed and fully submerged, allowing the enzymes sufficient time to convert starches. After an hour of mashing, the conversion process is complete, and the next step involves raising the malt pipe to prepare for sparging, effectively separating the now sugar-rich wort from the spent grains.Maximizing Efficiency with Sparging Techniques
Sparging is a rinsing process designed to extract any remaining fermentable sugars from the spent grain bed, significantly increasing your brewing efficiency and overall beer yield. After the mash, the grain bed still holds valuable sugars that can be recovered with hot water. For this process, setting your hot liquor tank to 78 degrees Celsius is recommended. This temperature is hot enough to thoroughly rinse the sugars without being so hot that it extracts undesirable tannins from the grain husks, which can lead to astringency in the finished beer. The hot sparge water is gently run over the grain bed, effectively washing the sugars into your boiler. This technique is akin to rinsing out a tea bag to get every last bit of flavor. Once all the sparge water has drained through the grain bed and into the boiler, you can ramp up the heat to bring the wort to a rolling boil. This transition marks the end of sugar extraction and the beginning of the crucial boiling phase, where hops are added and the wort is sanitized and concentrated.Boil Over Prevention: The Extender Tube Advantage
During the vigorous boiling stage, particularly with a full boiler, there is a risk of boil-overs, which can create a significant mess and waste precious wort. An extender tube, common on systems like the BrewZilla, offers a simple yet effective solution. This attachment increases the total volume capacity of your boiler, providing essential “wiggle room” to prevent the wort from foaming over the top during a strong boil. It’s a pragmatic addition, much like leaving extra space in a pot when simmering soup. The boiling process itself is vital for several reasons: it sterilizes the wort, extracts bitterness from hops, and drives off undesirable volatile compounds. The decision to use an extender tube is primarily a practical one, enhancing convenience and safety by mitigating the risk of a sticky, sugary overflow.The Boil: Bittering Hops and Wort Clarification
Once the wort reaches a rolling boil, it is time to introduce the bittering hops. For this Australian Pale Ale, only 8 grams of Galaxy hops are added at this stage, focusing on a subtle bitterness that complements the overall flavor profile without overpowering it. This measured approach ensures the beer remains incredibly balanced and sessionable. While a hop spider can help contain hop debris, simply tossing the hops directly into the boiler is perfectly acceptable, as their primary function here is bitterness extraction. Approximately 15 minutes before the end of the 60-minute boil, three Whirlfloc tablets are introduced. These tablets, derived from red seaweed, contain specific enzymes and compounds that effectively coagulate proteins and other haze-forming particles in the wort. Think of it as a natural magnet for cloudiness; these compounds bind to unwanted elements, causing them to clump together and settle out. This addition is crucial for achieving a brilliantly clear beer, making the final product as visually appealing as it is delicious.Cooling and Whirlpooling: Mastering Hop Aromatics
After the boil, rapidly cooling the wort is essential to prevent unwanted bacterial growth and to prepare for hop additions that preserve delicate aromas. While immersion chillers or plate chillers offer efficient cooling, alternative methods are perfectly viable if you lack specialized equipment. Submerging your boil kettle in an ice bath or even allowing it to cool naturally, albeit slower, can achieve the desired temperature reduction. The critical point is to bring the wort down to 75 degrees Celsius before the whirlpool stage. Whirlpooling at 75 degrees Celsius is a technique specifically employed to extract maximum flavor and aroma from hops without introducing additional bitterness. At this temperature, the alpha acids in the hops, responsible for bitterness, do not isomerize, meaning they do not convert into their bitter form. Instead, the hop oils, rich in aromatic compounds, are effectively steeped into the wort. This process is like steeping loose-leaf tea at the optimal temperature to extract its delicate flavors without making it astringent. Using a pump, a drill with a paint mixer, or even a large spoon to create a vigorous whirlpool ensures the hops are thoroughly integrated, allowing their essential oils to diffuse into the wort over 20 minutes before final cooling to pitching temperature.Yeast Pitching: The Start of Fermentation
The final cooling stage prepares the wort for yeast pitching, a critical step that initiates fermentation and defines the beer’s alcoholic strength and much of its character. The ideal pitching temperature is highly dependent on the chosen yeast strain. For Kveik yeast, known for its high-temperature tolerance and rapid fermentation, a pitching temperature of 35 degrees Celsius is perfect, as this promotes its unique clean fermentation profile. In contrast, traditional English or American ale yeasts, such as S-04 or US-05, require significantly cooler conditions, typically 18-19 degrees Celsius, to produce their characteristic clean flavors and prevent off-flavors. Once the wort reaches the appropriate pitching temperature in your fermenter, whether it’s a sophisticated stainless steel unit or a simple bucket, it’s time to introduce your yeast. This is the moment the “golden goodness” begins its transformation into a fully-fledged Australian Pale Ale, as the yeast cells eagerly begin consuming the sugars.Strategic Dry Hopping for Enhanced Aroma
Dry hopping is an optional yet highly recommended step that dramatically boosts the hop aroma and flavor of your Australian Pale Ale without adding bitterness. The timing of this addition is crucial: it should occur when your gravity reading reaches approximately 1.014, signaling that only a few points remain before fermentation concludes. This strategic timing, often around day 10 for this recipe, helps prevent a phenomenon known as “hop creep.” Hop creep can occur when dry hops, particularly those with residual enzymes, re-ferment any unfermentable sugars, leading to an over-attenuated beer and potential off-flavors. For this recipe, a generous addition of 60 grams each of Azacca, El Dorado, and Galaxy hops creates an intensely aromatic beer. While specialized zero-oxygen dry hopping systems exist to minimize oxygen exposure—much like sealing an expensive spice jar to preserve its freshness—they are not essential. If you are using a standard fermenter, simply open it, dump your hops in, and close it as quickly as possible. This minimizes oxygen ingress, preserving the vibrant hop character and ensuring your Australian Pale Ale boasts an irresistible aroma that truly stands out.Tap Into Answers: Your Australian Pale Ale Q&A
What are the main ingredients used to brew this Australian Pale Ale?
The main ingredients include Pale Ale malt for the base, medium crystal malt for sweetness, a blend of Azacca, Galaxy, and El Dorado hops for flavor, and Kveik yeast for fermentation.
What is Kveik yeast, and why is it a good choice for brewing?
Kveik yeast is a robust and versatile yeast known for fermenting efficiently at higher temperatures, often producing clean flavors quickly. This makes it a great option for homebrewing.
Why is it important to mill (crush) grains properly before brewing?
Proper grain milling cracks open the grain husks to expose starches for sugar conversion, while keeping the husks mostly intact to act as a natural filter. This helps maximize sugar extraction and prevents problems during the mash.
What is the mashing process in brewing?
Mashing is the stage where crushed grains are steeped in hot water, allowing enzymes in the malt to convert complex starches into fermentable sugars. This step determines the beer’s sweetness, body, and eventual alcohol content.
What is dry hopping, and what does it do for the beer?
Dry hopping is an optional step where hops are added towards the end of fermentation to significantly boost the beer’s aroma and flavor without adding bitterness. It creates a vibrant hop character in the final product.