Why a French Saison is Your Ideal First Homemade Beer
You might wonder why a “French Farmhouse Ale” is recommended for beginners. The truth is, despite its fancy name, the Saison is incredibly forgiving, making it the perfect choice for your initial foray into **homemade beer**. This particular style, especially when brewed with WYEAST 3711 French Saison yeast, thrives at typical room temperatures, eliminating the need for complex temperature control systems often required for other beer styles. The robust and flavorful profile of a Saison can also mask minor imperfections that might occur during a beginner’s first brew. Its characteristic peppery, fruity, and spicy notes come from the yeast and a thoughtful blend of ingredients, resulting in a complex yet approachable beer. This ease of brewing, combined with its delicious and unique taste, ensures a high chance of success and a truly enjoyable first experience with **homebrewing**.Essential Equipment for Brewing Your Own Beer
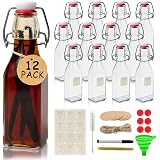
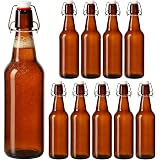
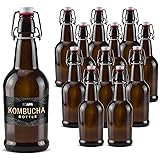
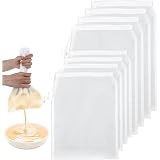
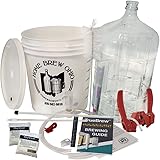
Before you dive into the exciting world of mashing and boiling, gathering the right tools is paramount. The video highlights the “bare essentials” you’ll need, but let’s elaborate on their purpose, ensuring you understand why each piece is crucial for successful **homemade beer** production. Remember, the goal is to start simple and expand your toolkit as your passion grows. * **6.5 Gallon Carboy (or fermenter):** This large, typically glass or plastic, vessel is where your beer will ferment. A 6.5-gallon size allows enough headspace for a 5-gallon batch, preventing overflow during active fermentation. * **Airlock & Stopper:** The airlock fits into the stopper, which seals the carboy. This ingenious device allows carbon dioxide (CO2) produced during fermentation to escape, while preventing airborne contaminants (like wild yeasts or bacteria) from entering your precious brew. * **Large Pot (easily holds 5 gallons):** A stainless steel pot is ideal for boiling your wort (unfermented beer). Its size is critical to accommodate the full volume of liquid, especially as it foams during the boil. * **Muslin Grain Sack:** Often called a grain bag, this allows you to steep your specialty grains, much like a giant tea bag. It keeps the grain solids separate from your liquid, making removal much easier. * **Racking Cane & Tubing:** This tool is used to transfer your beer from the fermenter to bottles, minimizing oxygen exposure and leaving behind the yeast sediment (trub). * **Auto-Siphon and Bottle Filler:** These work together with your racking cane to transfer beer smoothly and efficiently into bottles without disturbing the sediment. The bottle filler allows precise control for filling each bottle. * **Bottle Capper & Bottle Caps:** Essential for sealing your bottles, ensuring proper carbonation and preventing spoilage. * **Sanitizer:** While not equipment in the traditional sense, a good homebrewing sanitizer (like Star San or Iodophor) is arguably the most important “tool” you’ll acquire. We’ll discuss its critical role next. While a hydrometer is a common tool for more advanced brewers to measure specific gravity and calculate alcohol content, the video suggests it’s not strictly necessary for your first batch. Focus on the process and enjoyment for now; you can add it later as you become more comfortable.The Golden Rule: Mastering Sanitization in Homebrewing
Every single experienced brewer will emphasize one rule above all others: **sanitize everything!** This isn’t just a suggestion; it’s the bedrock of successful **homemade beer**. Overlooking this step is the quickest way to end up with off-flavors, spoiled beer, or even dangerous contaminants. Why is sanitization so critical? Your unfermented beer (wort) is a sugary, nutrient-rich liquid – a perfect breeding ground for undesirable microorganisms. Bacteria and wild yeasts, if introduced, can quickly outcompete your brewing yeast, leading to: * **Off-flavors:** Sour, vinegary, cheesy, or otherwise unpleasant tastes and aromas. * **Infection:** Visible mold, sliminess, or pellicles (a film-like growth) on the beer’s surface. * **Exploding bottles:** In severe cases, uncontrolled microbial activity can produce excessive CO2, leading to dangerous bottle explosions. To prevent these issues, you must sanitize every single piece of equipment that will come into contact with your wort *after* it has been boiled, and throughout the fermentation and bottling process. This includes your fermenter, airlock, stopper, racking cane, funnel, thermometer, bottling bucket, bottles, caps, and capper. Always follow the sanitizer manufacturer’s instructions for dilution and contact time to ensure effectiveness.Gathering Your Ingredients for a Unique Saison
The recipe for this French Saison is thoughtfully curated to provide a beginner-friendly yet flavorful experience. Understanding each component helps demystify the **brewing process** and appreciate the finished product. * **Grains:** * **1.5 lb Belgian Pilsen:** This forms the base malt, providing the primary fermentable sugars and a clean, crisp foundation. * **12 oz German Wheat & 12 oz Aromatic Wheat:** Wheat malts contribute to a fuller body, a softer mouthfeel, and improved head retention (the foamy top on your beer). Aromatic wheat can also lend a slightly biscuity or bready note. * **8 oz Special Roast (Lovibond 50):** This malt adds complex toasted flavors, often described as nutty or bready, and contributes to the beer’s color. Lovibond is a unit of color measurement for malt. * **4 oz Caramunich Malt:** Caramunich adds sweet caramel notes, a deeper golden color, and can enhance body. * *Tip:* Local homebrew shops are invaluable here. They can supply fresh, cracked grains and often offer expert advice. “Cracked” grains have their husks broken open, exposing the starchy interior for better sugar extraction during steeping. * **Liquid Malt Extract (LME):** * **5 lbs Pilsen Light Liquid Malt Extract:** This concentrated syrup provides the bulk of the fermentable sugars for your yeast. Using LME simplifies the process for beginners, bypassing a more complex mashing stage. * **Yeast:** * **WYEAST 3711 French Saison Yeast:** This specific strain is the star of the show. It’s renowned for its high attenuation (converting more sugars to alcohol), unique peppery and fruity esters, and ability to ferment well over a wide temperature range, including room temperature. The “slap pack” feature (activating the yeast by breaking an internal nutrient pouch) makes it incredibly convenient for beginners. Avoid using bread yeast or sourdough starter, as they will not yield the desired flavor profile or alcohol content. * **Hops:** * **0.5 oz Sorachi Ace Hops:** Added at the beginning of the boil, these are primarily bittering hops. They contribute a clean, crisp bitterness that balances the sweetness of the malt. Sorachi Ace also has unique citrus (lemon/lime) and dill notes. * **1 oz Styrian Goldings Hops:** Added near the end of the boil (10-minute mark), these are aroma and flavor hops. Their late addition preserves their delicate spicy, earthy, and floral characteristics, contributing significantly to the Saison’s bouquet. * **Spices:** * **3 g Grains of Paradise:** These African seeds offer a complex peppery, citrusy, and slightly floral flavor. * **10 g Coriander:** Often found in Belgian and Saison styles, coriander adds a bright, citrusy, and slightly spicy note. * **65 g Peeled, Sliced Fresh Galangal (or Ginger):** Galangal, a relative of ginger, imparts a sharp, citrusy, and piney spice. Ginger can be used as a readily available substitute, offering a similar pungent, zesty kick. These spices are traditionally wrapped in cheesecloth and added late in the boil to preserve their aromatic compounds.The Brewing Process: From Grains to Boiling Wort
With your ingredients and equipment ready, it’s time to begin the magical transformation from raw materials to unfermented beer, known as “wort.” 1. **Steeping the Grains:** Fill your muslin grain sack with the cracked specialty grains. Heat three gallons of water in your large pot to 160°F. Carefully immerse the grain sack, ensuring it’s fully saturated. Let it steep for one hour, maintaining the temperature by periodically checking and adjusting the heat. This step extracts colors, complex flavors, and unfermentable sugars from the specialty grains, which contribute to the beer’s body and character. Crucially, do not squeeze the grain bag when removing it; instead, gently rinse it with about four cups of hot water, allowing the liquid to drain through, maximizing sugar extraction without introducing harsh tannins. Discard the spent grains. 2. **Bringing to a Boil and Adding Malt Extract:** Bring the liquid (now called “pre-boil wort”) to a rolling boil. As soon as it boils, stir in the five pounds of Pilsen Light Liquid Malt Extract. Stir thoroughly to dissolve the extract completely and prevent it from scorching on the bottom of the pot. This is now your wort, and it’s packed with fermentable sugars. 3. **The Boil and Hop Schedule:** Once the wort is at a vigorous boil, set a timer for one hour. * **At the 60-minute mark (start of the boil):** Add 0.5 ounces of Sorachi Ace hops. These are your bittering hops, providing the beer’s structural bitterness. * **With 20 minutes remaining:** Prepare your spices – 3 grams of Grains of Paradise, 10 grams of coriander, and 65 grams of peeled, sliced fresh galangal (or ginger). Wrap these in cheesecloth and tie them off with kitchen twine to create a spice bag. Gently drop this bag into the boiling wort. Adding spices later in the boil preserves their delicate aromatic compounds. * **With 10 minutes remaining:** Add 1 ounce of Styrian Goldings hops. These are your aroma and flavor hops, contributing their distinct characteristics to the finished beer. * Continue the boil for the full hour, ensuring continuous, vigorous activity to isomerize hop acids, sterilize the wort, and concentrate sugars.Cooling and Pitching: Yeast’s Crucial Moment
After the boil, your wort is hot, sterile, and ready for yeast. However, you cannot add the yeast directly to hot wort; it would kill them. Rapid cooling is essential, and this stage is when your wort is most vulnerable to contamination. 1. **Rapid Cooling:** Cool your wort down to 80°F as quickly as possible. A common and effective method for **homebrewing** is to create an ice bath in your kitchen sink. Fill the sink with ice and a little water, then carefully submerge your brewing pot. Stirring the wort and gently swirling the pot in the ice bath will accelerate the cooling process. 2. **Sanitization is Paramount:** As the wort cools, it is incredibly susceptible to airborne bacteria and wild yeasts. Every single item that will touch the wort from this point forward *must be thoroughly sanitized*. This includes your carboy, funnel, airlock, stopper, and anything else coming into contact. 3. **Transfer to Fermenter:** Once the wort reaches 80°F, use your sanitized funnel to carefully transfer it into your sanitized 6.5-gallon carboy. Top it off with enough filtered or bottled water to reach the 5-gallon mark. 4. **Pitching the Yeast:** Your WYEAST 3711 French Saison yeast pack should have been “slapped” (activated) a few hours prior and left at room temperature to swell. Sanitize the exterior of the yeast pack and a pair of scissors. Carefully snip a corner of the pack and pour the liquid yeast directly into the wort in your carboy. This is called “pitching” the yeast. 5. **Seal and Airlock:** Securely fit the sanitized stopper into the carboy opening, then insert the sanitized airlock into the stopper. Fill the airlock with a small amount of sanitized water or vodka to create a barrier against contamination while allowing CO2 to escape. Ensure it’s fully locked down.Fermentation: The Magic of Transformation
With the yeast pitched and the airlock in place, the magical process of fermentation begins. This is where the yeast consumes the sugars in the wort and converts them into alcohol and carbon dioxide. 1. **Darkness and Room Temperature:** Place your carboy in a dark area, away from any direct sunlight, at room temperature. The video presenter hilariously demonstrates the importance of blocking light; UV rays can quickly “skunk” your beer, giving it an unpleasant aroma. Maintain a consistent room temperature (ideally between 65-75°F for this yeast strain, which is why it’s so beginner-friendly). 2. **Observation for 14 Days:** Over the next 14 days, you should observe several signs of active fermentation: * **Airlock Bubbling:** You’ll see bubbles steadily escaping through the airlock, indicating CO2 production. * **Krausen:** A foamy, often thick, layer will form on the surface of your beer. This “krausen” is a healthy sign of active yeast. * **Yeast Cake/Trub:** As fermentation progresses and then slows, yeast and other sediment will begin to settle at the bottom of the fermenter, forming a “yeast cake” or “trub.” This is normal. Allow the beer to ferment undisturbed for the full 14 days. Resist the urge to open the fermenter, as this introduces oxygen and potential contaminants. Patience is a key virtue in **homebrewing**.Bottling and Conditioning: The Final Stages
After 14 days, your beer has fermented, but it’s not quite ready to drink. It needs to be bottled and conditioned to become carbonated and reach its full flavor potential. 1. **Sanitize, Sanitize, Sanitize (Again!):** This step is just as critical as initial sanitization. Every bottle, bottle cap, auto-siphon, racking cane, and bottle filler *must be immaculately sanitized*. 2. **Priming for Carbonation:** For your beer to become bubbly, you need to introduce a small amount of sugar into each bottle to encourage a secondary fermentation. The video recommends using conditioning tablets (pure corn sugar) for ease, suggesting four to five tablets per bottle. This small amount of sugar will be consumed by the residual yeast in the bottle, creating CO2 that dissolves into the beer, carbonating it. 3. **Siphoning and Filling Bottles:** * Attach your racking cane to the auto-siphon, and the other end of the siphon tubing to a bottle filler. * Carefully insert the racking cane into your fermented beer, being extremely cautious *not* to touch the bottom of the carboy. You want to avoid disturbing the yeast cake/trub, as siphoning this sediment will result in cloudy beer and potential off-flavors. * Use the auto-siphon to start the flow of beer. Press the bottle filler against the bottom of each bottle to begin filling. Gravity will do most of the work. * Fill each bottle completely to the top. When you remove the bottle filler, the liquid level will drop to the perfect headspace for carbonation. Underfilling can lead to under-carbonation, while overfilling risks bottle explosions. 4. **Capping:** Once filled, immediately cap each bottle using your sanitized bottle capper. Ensure a tight seal. Having a friend help with capping can make the process quicker and more efficient. 5. **Bottle Conditioning:** Place the capped bottles in a dark, room-temperature location (like a closet or cupboard) for at least three weeks. The video suggests putting them in a box, which is a good precaution in the rare event of a “bottle bomb” (though unlikely with proper priming). During this bottle conditioning period, the priming sugar ferments, naturally carbonating your beer.Enjoying Your Handiwork: A Taste of Victory
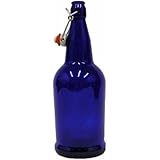
After three long weeks of bottle conditioning, your **homemade beer** is finally ready to chill! Move your bottles to the refrigerator and let them get nice and cold for at least 24 hours. The cold temperature helps the CO2 dissolve better and clarifies the beer. The moment you crack open that first bottle, you’re not just enjoying a beverage; you’re savoring the culmination of your efforts, a testament to your patience and newfound skill. Pour it into a glass, admire the color, the clarity, the foamy head, and take pride in the fact that you crafted this delicious French Saison yourself. Brewing your own beer is more than just a hobby; it’s an art form that empowers you to create exactly what you want to drink. It’s a “fun kitchen project” that yields truly delicious and satisfying results. Welcome to the wonderful world of **homebrewing**!Hops & Help: Your Brewing Q&A
What is homebrewing?
Homebrewing is the process of crafting your own beer from scratch at home. It allows you to control all the ingredients and create a drink tailored to your taste.
Why is a French Saison recommended for beginners?
A French Saison is ideal for beginners because it’s very forgiving and can ferment well at typical room temperatures, eliminating the need for complex temperature control systems. Its robust flavor can also hide minor imperfections.
What are some essential pieces of equipment needed to start brewing beer at home?
You’ll need a fermenter (like a carboy), an airlock and stopper, a large pot for boiling, a muslin grain sack, a racking cane with tubing, a bottle capper, and sanitizing solution.
What is the most important rule to remember when homebrewing?
The most important rule is to sanitize everything. Any equipment that touches your beer after it has been boiled must be thoroughly sanitized to prevent contamination and off-flavors.
How long does it take to make a batch of homemade beer?
After the initial brewing day, your beer typically ferments for 14 days, followed by at least three weeks of bottle conditioning. This means it takes roughly five weeks before your beer is ready to drink.