The art of homebrewing is a rewarding endeavor, yet it often comes with its own set of challenges. Enthusiasts commonly encounter hurdles related to time constraints, the expense of specialized equipment, and the pursuit of consistent results. However, with a few clever strategies, it is entirely possible to streamline your brewing process, reduce costs, and elevate the quality of your homemade beer.
The accompanying video offers a glimpse into some ingenious homebrewing hacks that can transform your brew day. These insights are not only designed to save you money but also to significantly enhance efficiency, allowing you to enjoy your craft without unnecessary complications. From innovative heating methods to clever fermentation solutions, these tips address common pain points faced by brewers looking to optimize their setup.
Innovative Heating Solutions for Efficient Homebrewing
Achieving and maintaining precise temperatures is paramount in various stages of the brewing process, particularly during mashing and sparging. Fortunately, there are several resourceful methods available for temperature management that do not necessitate a significant investment in high-end equipment.
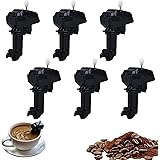
Utilizing a Coffee Maker for Last-Minute Sparge Water
When an unexpected shortfall in pre-boil quantities occurs, or when additional sparge water is required swiftly, a standard coffee maker can prove to be an invaluable tool. This common household appliance is capable of heating water to approximately 180 degrees Fahrenheit, which is an ideal starting point for sparging. Furthermore, a typical coffee pot holds about half a gallon of water, allowing for quick batches.
To prepare sparge water effectively, the hot water from the coffee maker can be combined with room-temperature water. This adjustment helps achieve the desired sparge temperature, typically around 170 degrees Fahrenheit, within minutes. This method not only offers immediate utility but also minimizes downtime, making the sparging process more fluid and less prone to delays. The process involves pouring the heated water into a pot, refilling the coffee maker for subsequent rounds, and then rinsing the grains efficiently.
The importance of proper sparge water temperature cannot be overstated in homebrewing. When hot water is rinsed over the mash, it serves to extract residual sugars from the grain bed, which are vital for fermentation. Maintaining the correct temperature ensures that these sugars are extracted efficiently without also leaching undesirable tannins from the grain, which can introduce astringency into the final beer. Therefore, a quick and reliable way to heat sparge water, such as with a coffee maker, directly contributes to both process efficiency and beer quality.
Leveraging a Sous Vide Stick for Mash Temperature Control
Mash temperature stability is critical for enzymatic activity that converts starches into fermentable sugars, directly impacting the beer’s body and alcohol content. A sous vide immersion circulator, traditionally used for cooking, presents an innovative solution for maintaining mash temperatures with remarkable precision. Devices such as the Inkbird 1000-watt sous vide stick, priced around $85, can be utilized to hold mash temperatures consistently over extended periods.
Initially, it may be necessary to use a propane burner or another heat source to bring the mash to the desired temperature quickly. Subsequently, the sous vide stick can be deployed to maintain this temperature indefinitely, preventing any heat loss from the mash tun. For instance, a mash can be held at 152 degrees Fahrenheit for an hour, or 5 gallons of water can be maintained at 170 degrees Fahrenheit for another full hour, demonstrating the stick’s impressive thermal retention capabilities. This method essentially transforms a standard mash tun into a pseudo-electric brew system, offering precise temperature regulation without the need for constant monitoring.
The versatility of a sous vide stick extends beyond just mash temperature. It can be used to heat strike water or even to maintain the temperature during a step mash, where specific temperatures are held for different durations to activate various enzymes. However, it is imperative to ensure that the sous vide stick’s dimensions are compatible with your brewing kettle. For instance, in a 20-gallon kettle, a standard sous vide stick might not effectively circulate water if the volume is too low, making it essential to match the device to the kettle size and liquid volume. The warranty often specifies temperature maintenance up to 212 degrees Fahrenheit, suggesting its potential for various heating applications within homebrewing, though extreme applications like kettle sours should be approached with caution due to potential material interactions.
Optimizing the Fermentation Process
Fermentation is where the magic truly happens, transforming wort into beer. Several adjustments to this stage can significantly improve both the ease of the process and the quality of the final product.
The Advantages of Magnetic Dry Hopping
Dry hopping, the process of adding hops to fermenting or conditioned beer, is instrumental in imparting vibrant hop aroma and flavor. Traditionally, this involves opening the fermenter, which introduces oxygen—a major antagonist to beer stability and freshness. Magnetic dry hopping offers an elegant solution to this challenge.
By using sous vide grade magnets, which are remarkably strong, hops can be secured within a mesh bag and attached to the inside of the fermenter. A corresponding magnet is then placed on the exterior. When the time comes to dry hop, the exterior magnet is simply pulled away, allowing the hops to fall into the beer without ever exposing it to oxygen. These magnets are capable of holding approximately one to one and a half ounces of hops, and multiple magnets can be used for larger dry hop additions. This method not only prevents oxygen ingress but also facilitates easy removal of hop material post-dry hopping, minimizing potential trub (sediment) in the finished beer.
The detrimental effects of oxygen on beer, especially during and after fermentation, are well-documented. Oxygen can lead to oxidation, resulting in stale, cardboard-like flavors and a significantly reduced shelf life. Consequently, any technique that minimizes oxygen exposure, such as magnetic dry hopping, is a considerable improvement for producing higher-quality, more stable homebrew. Furthermore, the cost-effectiveness of these magnets makes this a highly accessible hack, ensuring that premium dry hopping techniques are within reach for most homebrewers.
Embracing Metal Grain Baskets for Brew-In-A-Bag (BIAB)
Brew-In-A-Bag (BIAB) has democratized all-grain brewing, simplifying what was once a multi-vessel process. While traditional fabric bags are functional, they can be prone to tearing and may not always provide optimal sparge efficiency, as water can sometimes channel around the grains rather than through them. A metal grain basket presents a robust and efficient alternative.
Metal grain baskets, particularly wider versions, allow for a more consistent and even sparge. When water is poured over the grain, it is forced to filter through the entire grain bed, maximizing sugar extraction. These baskets are durable, easy to clean, and eliminate the risk of tears associated with fabric bags. Brands like Clawhammer offer high-quality metal baskets that integrate seamlessly into a BIAB setup. The increased width of these baskets is particularly beneficial, as it creates a shallower, broader grain bed, which is conducive to better flow and extraction during rinsing.
Transitioning to a metal grain basket can significantly enhance the BIAB experience by improving both the efficiency and ease of the sparging phase. This upgrade often leads to a more predictable brew, as the consistency of extraction is improved. Consequently, the brewer can achieve a more reliable pre-boil gravity and ultimately, a more consistent final product.
Cost-Effective Fermentation and Bottling Solutions
The expense of dedicated brewing equipment can quickly accumulate, but many essential items can be sourced or customized affordably, without compromising on functionality or safety.
DIY Food-Grade Buckets with Spigots
Plastic buckets are favored by many homebrewers as versatile fermenters due to their affordability and ease of cleaning. Food-grade plastic buckets are readily available at stores like Home Depot, often found in the paint aisle for around $5. These buckets provide a safe and effective vessel for fermentation. To further enhance their utility, food-grade spigots can be easily installed.
By adding a spigot to these buckets, they can be transformed into multi-purpose tools: primary fermenters, secondary fermenters, bottling buckets, or even sanitation stations. This modification drastically simplifies the transfer process, eliminating the need for siphoning—a task that is often cumbersome and carries a higher risk of oxygen exposure and contamination. Drilling into plastic is a straightforward process, typically involving a spade bit for the initial hole and then a step drill bit to enlarge and smooth the opening, ensuring a secure fit for the spigot. These customized buckets can be created for approximately $7, representing a significant cost saving compared to commercial fermenters with built-in spigots.
The ability to transfer beer without siphoning not only saves labor but also reduces the chances of disturbing the yeast cake and other sediment at the bottom of the fermenter, leading to clearer beer. Moreover, the controlled flow provided by a spigot is invaluable when bottling or transferring to kegs, making the entire packaging process more efficient and hygienic. This DIY approach embodies the spirit of homebrewing: innovative, practical, and budget-conscious.
Embracing Modern Yeast Practices
Yeast is the engine of fermentation, and advancements in yeast science have opened up new avenues for efficient and versatile brewing.
The Benefits of Kveik Yeast and Hot Pitching
Kveik yeast, a family of Norwegian farmhouse yeasts, has revolutionized homebrewing with its exceptional performance at high temperatures. Traditionally, wort is chilled to around 70 degrees Fahrenheit before yeast is pitched to prevent off-flavors. However, kveik strains thrive at much warmer temperatures, often pitched around 110 degrees Fahrenheit, without producing undesirable esters or phenols. This characteristic significantly accelerates the homebrewing process.
Pitching kveik yeast hot means that brewers can largely bypass the lengthy and water-intensive cooling phase of the wort. This not only saves a considerable amount of time but also conserves water, making the brewing process more sustainable. Kveik yeast ferments rapidly and often attenuates fully within a few days, leading to a quick turnaround for finished beer. Its robustness and ability to handle a wide temperature range make it incredibly forgiving, suitable for brewers who may struggle with precise temperature control or those looking to reduce their brew day duration. Many kveik strains also flocculate well, leading to clearer beer with less effort.
Furthermore, the high-temperature fermentation profile of kveik yeast allows for the production of diverse beer styles, from clean lagers to fruity ales, all with a distinct yeast character that can be tailored by adjusting fermentation temperatures. This versatility, combined with its resilience, positions kveik as a premier choice for modern homebrewers seeking both efficiency and quality.
The Resurgence of Dry Yeast
For many years, liquid yeast was often considered superior by serious homebrewers, while dry yeast was sometimes perceived as a lesser alternative with a reputation for producing inconsistent results. However, modern dry yeast strains have undergone significant advancements in production and quality, completely transforming their standing in the brewing community. Today, dry yeast is more popular than ever, and for good reason.
The advantages of dry yeast are numerous. It boasts a significantly longer shelf life and requires no refrigeration until rehydrated, making it incredibly convenient for storage and spontaneous brew days. Crucially, it eliminates the need for expensive overnight shipping with ice packs, which can cost upwards of $25 for liquid yeast. Moreover, dry yeast packets typically contain a higher cell count than liquid yeast vials, often sufficient for direct pitching into standard gravity wort without requiring a starter. This reduces both preparation time and the risk of contamination associated with starter cultures.
The reliability and performance of current dry yeast strains are comparable to, and in some cases even surpass, liquid yeast. Brewers can now achieve excellent fermentation profiles and desired flavor characteristics with a wide array of dry options, spanning ale, lager, and even specialty strains. Therefore, for any homebrewer prioritizing convenience, cost-effectiveness, and consistent results, embracing modern dry yeast is a highly recommended and practical hack for enhancing their brewing endeavors.
Fermenting Your Homebrewing Questions: A Q&A
What are homebrewing hacks?
Homebrewing hacks are clever tips and tricks designed to streamline your brewing process, reduce costs, and improve the quality of your homemade beer. They help address common challenges like time constraints and equipment expenses.
How can a regular coffee maker help with homebrewing?
A coffee maker can quickly heat small batches of water to around 180°F, which is perfect for preparing sparge water when you need extra quickly. This helps extract more sugars from your grains efficiently.
What is Kveik yeast and why is it useful for homebrewers?
Kveik yeast is a type of Norwegian yeast that can ferment beer at much higher temperatures than traditional yeasts. This allows brewers to largely bypass lengthy cooling, saving time and water, and it ferments very quickly.
What are the benefits of using modern dry yeast for brewing?
Modern dry yeast has a long shelf life, doesn’t require refrigeration until rehydrated, and often contains enough cells for direct pitching without needing a starter. This makes it convenient, cost-effective, and reliable for consistent results.