Welcome, fellow brewers! If you have just watched our comprehensive video on brewing the first batch with the Anvil Foundry all-grain brewing system, you are ready for a deep dive. This guide expands on the practical insights shared, offering detailed explanations and expert tips. Mastering your electric brewing setup becomes simple. We will cover every crucial step, ensuring a successful brew day.
The Anvil Foundry system targets beginner all-grain brewers, offering robust features. Yet, its capabilities extend to intermediate users refining their craft. Understanding each process enhances your brewing journey. This post provides the foundational knowledge needed. It complements the visual demonstration, making your next brew flawless.
Setting the Stage for Your Anvil Foundry Brew Day
Every successful brew starts with meticulous planning. The foundation is a well-chosen recipe kit. For instance, the MoreBeer Haze Craze New England IPA kit is a superb choice. It provides 13 pounds, 4 ounces of grain, demanding precision.
Organization is paramount for all-grain brewing. Line up all your ingredients. Prepare your equipment in advance. This approach streamlines the process, reducing potential errors. A smooth brew day is a joyful brew day.
Water Chemistry: The Hidden Variable in NEIPA Production
Water chemistry is a critical, often overlooked, component. It significantly impacts flavor profiles. For New England IPAs (NEIPAs), a higher chloride-to-sulfate ratio is preferred. This ratio accentuates juicy hop characteristics.
We deviated from a standard pale ale profile. Instead, we prioritized chloride over sulfates. Specifically, 0.5 gram per gallon of gypsum (sulfate) was used. In contrast, 1 gram per gallon of chloride was added. This minor adjustment profoundly shapes the final beer. It enhances the desired hazy, fruity notes.
Mastering the Mash with Your Anvil Foundry
The mashing phase is where starches convert into fermentable sugars. This is the heart of your brew. Begin by adding 6.7 gallons of strike water. The Anvil Foundry’s preheat function is a game-changer. Set your strike temperature to 160°F. Apply 100% power for rapid heating. You can schedule this to run overnight, up to nine hours.
Once heated, ensure the mash basket is in place. Then, carefully mash in your grains. Stir continuously to prevent dough balls. Achieving full grain saturation is vital. After a thorough stir, let the mash rest for ten minutes. This allows initial hydration and enzyme activation.
Next, initiate circulation. Attach the malt pipe screen to disperse liquid evenly. Adjust the pump flow to about 50%. A gentle flow prevents grain bed compaction. Too aggressive a flow can lead to channeling. We aimed for a consistent, smooth return.
Maintaining temperature is crucial during the mash. The target was 152°F. Running on 240 volts, 30% power was initially too low. We adjusted to 40% power. This held the temperature steadily, fluctuating only by one degree. The Anvil Foundry’s controller proved highly responsive.
Raking the mash helps prevent channeling and improves extraction. Every 15 minutes, gently rake the top third of the grain bed. Avoid disturbing the bottom layers. This maintains a healthy, efficient flow. It ensures all sugars are effectively rinsed.
Mash Out and Sparging for Maximum Extraction
Following the mash, a mash out step prepares the grain bed for sparging. Increase the mash temperature to 170°F. Maintain 50% power for a slower, controlled ramp-up. This step stops enzymatic activity. It also lowers wort viscosity, making sugar rinsing easier.
For sparging, lift the malt pipe and place it on its rest ring. This allows it to drain fully. Slowly pour approximately 0.75 gallons of heated sparge water over the grain bed. We used a separate induction plate and Anvil kettle to heat this water. Slow sparging is key for efficient sugar extraction. It avoids disturbing the grain bed, maintaining clarity.
Your collected volume will depend on your voltage. Running at 240 volts results in more boil-off. Consequently, you will collect a larger pre-boil volume. Always refer to your manual for specific guidance. This ensures you hit your target batch size accurately.
The Boil: Hops, Hot Break, and Efficiency
As you collect wort, immediately kick up the heat. Aim for a vigorous boil. On 240 volts, the Anvil Foundry delivers an impressive 2800 watts. This creates a powerful, rapid boil. A strong boil contributes to important chemical reactions. It drives off unwanted volatile compounds.
Consider a first wort hop addition. We added 0.5 ounce of Warrior hops at this stage. First wort hopping creates a smoother, less harsh bitterness. This method is gaining popularity among craft brewers. It rounds out the hop profile beautifully.
Observe the “hot break” as the boil begins. This is when proteins coagulate and separate. It indicates a healthy, vigorous boil. Set a 45-minute timer for the initial boil phase. At this point, add your wort chiller. This sanitizes the chiller in the boiling wort. Sanitation is non-negotiable for quality beer.
Specific hop additions define your beer’s character. We added 1 ounce of Citra hops at the 5-minute mark. This provides late-boil aroma and flavor. Immediately at flameout (element off), another 1 ounce of Citra was added. We also included 2 ounces of Mosaic whole hops. Use a hop bag for whole hops; they can clog pumps easily. This technique maximizes hop aroma. It prevents hop particles from entering your fermenter.
Cooling and Fermentation Preparation with the Anvil Foundry
Rapid chilling is vital for preventing off-flavors. Circulate cold water through your chiller. Manual stirring helps distribute heat. Our batch chilled down in 15-20 minutes with this method. Quickly bringing the wort to fermentation temperature is a best practice.
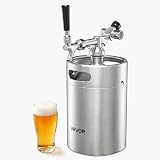
Next, transfer the chilled wort to your fermenter. We used a Blichmann Conical for pressurized fermentation. This setup offers advanced control over fermentation. Remember to close your sampling valve! Forgetting this step results in spilled wort, a common brewing mishap.
The Anvil Foundry proved its efficiency by delivering our target gravity. We achieved an Original Gravity (OG) of 1.061. This matched the kit’s expected range (1.061-1.063). This corresponds to roughly 70% brewing efficiency. Achieving target gravity on your first run is always a success. It confirms the system’s accuracy and your process.
Anvil Foundry Performance & Expert Insights
The Anvil Foundry system performed flawlessly throughout the brew day. Its controller maintained temperatures within one degree. There were no major oscillations, ensuring consistent enzymatic activity. The ultra-low wattage density elements prevented scorching. The kettle bottom remained pristine after boiling. This is a testament to its design and heating capabilities.
Operating on 240 volts significantly boosts performance. Heating times are drastically reduced. Boil vigor is intense, aiding in hot break formation. While 120-volt operation is effective, 240V offers a distinct advantage. This translates to a faster, more efficient brew day. The Anvil Foundry stands as a powerful contender in the all-grain electric brewing system market.
Anvil Foundry Q&A: From Grain to Glass, Your Questions Answered
What is the Anvil Foundry brewing system?
The Anvil Foundry is an electric brewing system designed for all-grain brewing, offering robust features for both beginner and intermediate homebrewers.
Why is it important to plan my brew day?
Planning helps ensure a successful brew day by streamlining the process, reducing potential errors, and making sure all ingredients and equipment are ready.
What happens during the “mashing” phase of brewing?
Mashing is when starches from the grains are converted into fermentable sugars, which is a fundamental step in creating the beer’s foundation.
Why should I pay attention to water chemistry when brewing an NEIPA?
Water chemistry is critical for NEIPAs because specific mineral ratios, like a higher chloride-to-sulfate ratio, accentuate the desired juicy hop characteristics and hazy, fruity notes.
Does operating the Anvil Foundry on 240 volts offer any advantages?
Yes, running the Anvil Foundry on 240 volts significantly boosts performance by drastically reducing heating times and creating a more vigorous boil, leading to a faster brew day.