Ready to Brew Your Own Simple Pilsner Beer?
Ever dreamed of crafting your own beer? Perhaps you thought homebrewing was too complex or expensive. Many aspiring brewers face this hurdle. However, making a delicious simple Pilsner beer doesn’t require a commercial brewery. In fact, you can create a satisfying batch right in your kitchen.
This article expands on the video above, offering a detailed guide. We will walk you through brewing a 1-gallon batch of simple Pilsner beer. It focuses on minimal equipment and a budget-friendly approach. Forget fancy gadgets. Embrace the hands-on satisfaction of DIY fermentation.
Crafting Your 1-Gallon Pilsner Beer: The Essentials
Homebrewing requires precision. Yet, it also thrives on simplicity. The video outlines specific ingredients. They are key to your simple Pilsner beer.
Ingredients for Your Pilsner Batch
- **Belgian Pilsner Malt:** You will need two pounds. This malt provides fermentable sugars. It defines the Pilsner’s character. Ensure it is pre-milled for best results.
- **Saaz Hop Pellets:** One ounce is sufficient. Saaz hops are classic for Pilsners. They add floral and spicy notes. These hops balance the malt sweetness.
- **Saflager S23 Dry Lager Yeast:** One packet works wonders. This specific yeast is ideal for lagers. It ferments cleanly at cooler temperatures. This contributes to that crisp Pilsner finish.
- **Priming Sugar:** About one cup is perfect. This is added at bottling. It creates carbonation in your finished beer. Sugar wakes up dormant yeast. They then produce CO2 in the bottle.
- **Spring Water:** A gallon and a half is necessary. Water quality impacts taste. Spring water is often preferred by brewers. However, filtered tap water can also work.
Essential Equipment for Simple Pilsner Brewing
Specialized gear can be costly. Instead, focus on multi-purpose items. The video highlights key tools. These tools make your brewing process smooth.
- **Fine Mesh Straining Bags:** You need one or more. These bags hold your grain during mashing. They keep grain bits out of your wort. Think of them as giant tea bags for your malt.
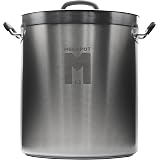
- **Large Pot (8-quart or larger):** This is your main vessel. It holds water and grain. It also handles the boil. A stock pot you already own might fit.
- **Fermenter with Spigot:** A fermenter is crucial. A spigot makes transfer easier. It minimizes oxidation. If yours lacks an airlock, acquire one.
- **Thermometer:** Essential for temperature control. Mashing temperatures are critical. Yeast health depends on precise readings. It’s your brewing compass.
- **Siphoning Hose:** Helpful for transfers. It reduces splashing. This protects your beer from oxygen exposure. Oxygen can cause off-flavors.
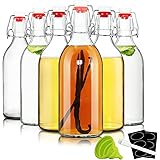
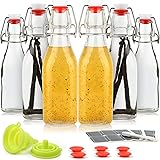
- **Bottles with Flip-Top Tops:** You need several. These bottles withstand pressure. They are perfect for bottle conditioning. Swing-tops are convenient and reusable.
- **Sanitizer of Choice:** Absolutely vital. Cleanliness is paramount. Sanitation prevents contamination. This protects your hard work.
The Art of Mashing: Extracting Sweetness
Mashing is where the magic begins. This step converts starches into sugars. It sets the stage for fermentation. Precision here defines your final beer.
Preparing the Grain
First, get your milled malt ready. Place it into straining bags. The video shows using several small bags. This helps manage the grain. Be mindful of fine powder. It can create a mess. Using a plate underneath helps. Transferring grain via a cup first also reduces spills. Think of it like carefully filling a coffee filter. You want the grounds contained.
Heating the Water and Mashing In
Head to your kitchen. Start heating your 1.5 gallons of water. Aim for a specific temperature range. You want 158 to 160 degrees Fahrenheit. This range activates enzymes in the malt. These enzymes break down starches. They create fermentable sugars. Once the target temperature is reached, add your grain bags. Submerge them completely. Put the lid back on the pot. Maintain the temperature at about 150 degrees for 90 minutes. If the temperature drops, turn on low heat. Bring it back up gently. This consistency is key. It ensures maximum sugar extraction.
Boiling Your Wort: Hops and Reduction
After mashing, you have “wort.” This sweet liquid is unfermented beer. Boiling sterilizes the wort. It also extracts hop flavors. This is a crucial step.
Removing the Grain and Starting the Boil
When 90 minutes are up, remove the grain bags. A slotted spoon helps here. Squeeze the bags gently. This extracts more sugary liquid. Now, bring your wort to a rolling boil. At this point, you no longer need the lid. Boiling helps to reduce the liquid. You aim for roughly one gallon of wort. This concentrates the sugars and flavors.
Adding Hops and Stirring
The video notes adding hops at the 20-minute mark. This refers to 20 minutes into the boil. Saaz hop pellets go in then. Hops contribute bitterness and aroma. The timing of hop additions matters greatly. Early additions give bitterness. Later additions enhance aroma. Stir your wort frequently. Sugars can settle. They may stick to the bottom. Consider it like making spaghetti sauce. Constant stirring prevents scorching. Scorched sugars can impart off-flavors.
Cooling and Fermentation: The Yeast’s Domain
Cooling the wort quickly is paramount. Yeast needs a specific temperature. Rapid cooling prevents bacterial growth. It also helps with clarity.
Rapid Cooling Techniques
Turn off the stove. Begin cooling your wort immediately. The goal is 60 to 70 degrees Fahrenheit. A sink filled with ice water works well. You can place the pot directly in it. Adding ice packs to the water helps speed things up. Imagine plunging a hot pan into cold water. That is the idea. Quick cooling minimizes contamination. It prepares the wort for yeast.
Transferring to the Fermenter and Pitching Yeast
Once cooled, transfer the wort. Move it carefully to your sanitized fermenter. Minimize splashing. This reduces oxygen uptake. Some fermenters have built-in airlocks. If yours doesn’t, attach one. Airlocks allow CO2 to escape. They prevent outside air from entering. The video mentions an Original Gravity (OG) of 1.060. This measures sugar density. It indicates potential alcohol content. Then, add your yeast. The video used three grams, or about one teaspoon. Distribute it evenly across the wort surface. Cap the fermenter securely. Label your batch clearly. Include the beer style, date, and OG. This data is invaluable for future brews.
Primary Fermentation
Place your fermenter in a dark place. Keep it there for about two weeks. This is primary fermentation. Yeast consumes sugars. It produces alcohol and CO2. You will see bubbles in the airlock. This signifies active fermentation. Patience is a virtue here. Rushing this step can affect flavor. Allow the yeast to do its job.
Bottling and Conditioning: The Final Transformation
After primary fermentation, your beer is ready for bottling. This is the stage for carbonation. It’s also where flavors fully develop.
Preparing for Bottling
After two weeks, check the Final Gravity (FG). The video’s FG was 1.018. This reading confirms fermentation completed. It also helps calculate ABV. Mix your priming sugar with a small amount of warm water. Dissolve it completely. Add this sugar solution to your fermenter. Stir gently to distribute. Do not introduce too much oxygen. Then, begin filling your bottles. Use a siphoning hose for this. Fill bottles to about one inch from the top. This leaves headspace for carbonation.
Bottle Conditioning and Clarity
The video produced one 40-ounce bottle and four 16-ounce bottles. This totals 104 ounces. That’s a good yield for a 1-gallon batch. The beer will appear cloudy. The video specifically notes no filtering was done. Many homebrewers enjoy unfiltered beer. Sediment might settle at the bottom. This is normal yeast sediment. Store your bottled beer in a cool, dark place. Let it sit for several days, perhaps four or five. This is secondary fermentation. Yeast consumes priming sugar. It produces carbonation. After this, move bottles to the refrigerator. Allow them to chill for at least three days. This further conditions the beer. It also helps settle sediment. Some brewers use cold crashing. This involves chilling the fermenter before bottling. It helps yeast settle out. This can improve clarity.
Tasting and Iteration: Learning from Your Simple Pilsner
The moment of truth arrives. It’s time to taste your creation. This is also a learning opportunity. What went well? What could be improved?
Evaluating Your Brew
Open a bottle carefully. Listen for the hiss of carbonation. A small head should form upon pouring. Observe the color and clarity. Remember, this simple Pilsner beer is unfiltered. It will likely be cloudy. Smell the beer. Note any aromas. Then, take a sip. The video describes a light flavor. This is typical for a Pilsner. It has some sweetness. However, it lacks heavy body. The speaker desired more carbonation. He also sought more bite or bitterness. These are common adjustments for homebrewers. Each batch offers lessons. It helps refine your process.
Lessons Learned and Future Improvements
The brewer noted several areas for improvement. A bigger pot would be helpful. This prevents boil-overs. Filtering before bottling would improve clarity. Leaving out more trub during transfer is another tip. Trub is the leftover material in the fermenter. It consists of yeast and hop debris. Removing it leads to a cleaner product. The speaker also considers brewing other styles. He wants something with more body. Perhaps a dark beer next time. The cost of homebrewing from scratch can exceed store-bought beer. However, the satisfaction is priceless. You claim, “I made this.” That experience is unique. This is the true reward of brewing a simple Pilsner beer.
Why Brew Small Batches?
A 1-gallon batch might seem small. However, it offers significant advantages. It is perfect for beginners. It minimizes investment. Moreover, it encourages experimentation.
Small batches mean less risk. If a batch goes wrong, it’s not a huge loss. They also ferment quicker. This allows for faster feedback. You can easily tweak recipes. Adjust ingredients. Try new hop combinations. This small scale supports learning. It lets you discover new flavors. Before committing to a larger quantity, try a gallon. This simple Pilsner beer is a prime example. It is a stepping stone. It builds confidence. You gain valuable experience. Perhaps your next simple Pilsner beer will be even better.
Tapping into Your 1-Gallon Pilsner Questions
What kind of beer will I learn to brew with this guide?
This guide teaches you how to brew a simple 1-gallon batch of Pilsner beer, which is designed to be beginner-friendly and budget-conscious.
What are the key ingredients for brewing this simple Pilsner?
You will primarily need Belgian Pilsner Malt, Saaz Hop Pellets, Saflager S23 Dry Lager Yeast, priming sugar, and spring water.
Do I need expensive specialized equipment to brew beer at home?
No, this guide focuses on using minimal and budget-friendly equipment, often including items you might already have, like a large pot, along with some basic brewing tools.
What is the purpose of the ‘mashing’ step when making beer?
Mashing is the first crucial step where you heat milled malt in water to activate enzymes that convert the grain’s starches into fermentable sugars, which yeast will later turn into alcohol.
Why is brewing a small 1-gallon batch recommended for beginners?
Small 1-gallon batches are great for beginners because they minimize risk if a batch goes wrong, ferment quicker for faster feedback, and allow for easy experimentation without a huge investment.